AXIGen
The AXIGen mail server is a popular groupware server for the Linux platform. Refer to http://www.axigen.com/ for more information. Follow the below steps to forward traffic from AXIGen to MailArchiva.
AXIGen Configuration
- Open the AxiGen Webadmin Interface (available at http://<hostname>:9000)
- Login using "admin" and the associated password
- Navigate to Security & Filtering -> Acceptance & Routing -> Advanced Settings. Here, press the 'Add Acceptance/Routing Rule' Button.
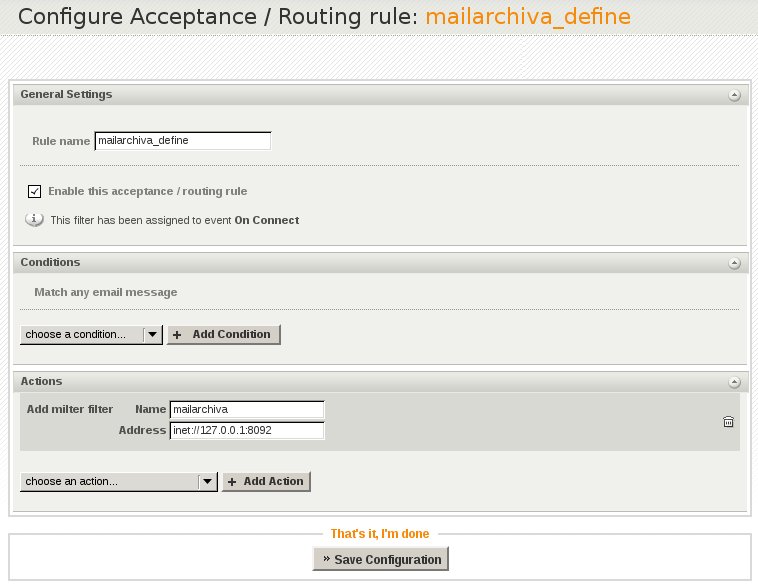
- Type a suggestive Rule name such as 'mailarchiva_define', then in the Actions section select the Add filter option from the Filters category and press Add Action.
- Type a name for the new filter, and fill the Address field with the connection address of Mailarchiva's MILTER listener.
By default, this listener is available on port 8092, therefore you need to use the following address: inet://127.0.0.1:8092
- Click the Save Configuration button.
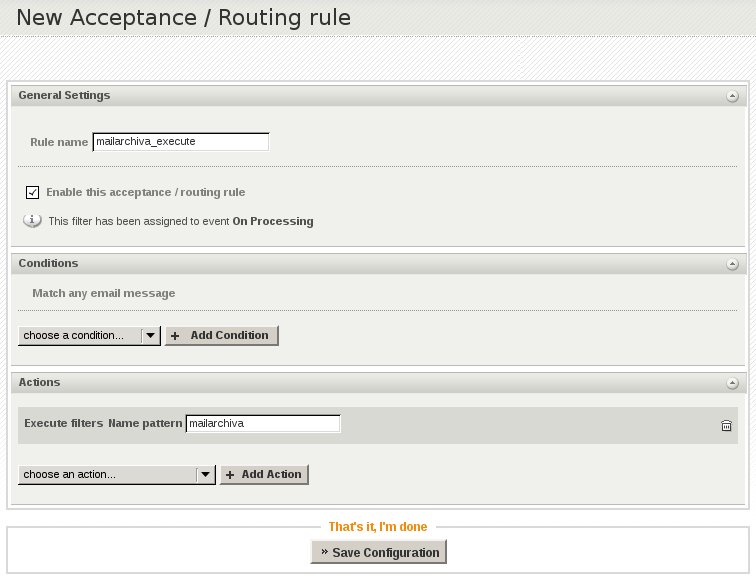
- Click the Add Acceptance/Routing Rule' button (This new filter will be used for actually calling the one we defined before.)
- Type a suggestive name such as 'mailarchiva_execute', then in the Actions section select the Execute filters option from the Filters category and press Add Action.
- Fill the Name pattern field with the name of the previously defined filter, in our case 'mailarchiva':
- Press the Save configuration button in order to activate the rule.
Newer Method (Using AxiFilter)
1. Download the archive from below link on the server where AXIGEN resides
http://support.axigen.com/
2. Extract the files from the archive
3. Copy the files in the specified locations
aximilter.afsl in /var/opt/axigen/filters
aximilter.conf in /etc/opt/axigen
4. set the proper permissions for those files
chown axigen:axigen /var/opt/axigen/filters/
chown axigen:axigen /etc/opt/axigen/aximilter.conf
5. Edit the file /etc/opt/axigen/aximilter.conf and specify for “milterIp" and "milterPort" the IP and the port where MailArchiva is listening
6. Make a copy of AXIGEN’s configuration file (/var/opt/axigen/run/axigen.
7. Edit this copy of the configuration file and add in the section “socketFilters" the following lines, after the last defined filter
name = "aximilter"
address = "inet://127.0.0.1:1981"
protocolFile = "/var/opt/axigen/filters/
idleTimeout = 60
actionOnMatch = discard
maxConnections = 10
maxMessageSize = 10240
}
8. In the same configuration file, in the section “serverActiveFilters" add the following lines after the last defined active filter
filterName = "aximilter"
filterType = socket
priority = 10
applyOn = (local relay)
}
9. Edit the file /etc/sysconfig/axigenfilters or /etc/default/axigenfiltes and modify the “DAEMONS" variable to look like
10. Edit the file /etc/init.d/axigenfilters and add before ‘MY_PARENT_NAME="$0"' line add the following lines
DAEMON_PATH_aximilter="/opt/
DAEMON_OPTIONS_aximilter=“"
10. Copy the axigenmilter binary file available at below link in /opt/axigen/bin directory; make sure that this binary file *is* executable
http://support.axigen.com/
11. Disable or delete from WebAdmin the two defined MailArchiva related rules (WebAdmin -> Security & Filtering -> Acceptance & Routing -> Advanced Settings)
12. Stop the AXIGEN service
13. Restart the axigenfilters (/etc/init.d/axigenfilters restart)
14. Make a back-up copy of AXIGEN’s configuration file
15. Replace the current configuration file with the configuration file modified earlier
16. Start the AXIGEN service
After that the emails should be passed to the MailArchiva using the aximilter filter.
MailArchiva Configuration
- Click Configuration->Listeners.
- Select Milter Listener in the drop down and then click the New Listener button.
- Check "Listen for incoming Sendmail/Postfix requests"
- Leave the Sendmail Milter port as 8092
- Click Save